Go 博客
Go 图像包
引言
image 和 image/color 包定义了许多类型:color.Color 和 color.Model 描述颜色,image.Point 和 image.Rectangle 描述基本的二维几何图形,而 image.Image 则将这两个概念结合起来,以表示一个矩形的颜色网格。一个单独的文章介绍了如何使用 image/draw 包进行图像合成。
颜色和颜色模型
Color 是一个接口,它定义了任何可以被视为颜色的类型的最小方法集:即可以转换为红色、绿色、蓝色和 Alpha 值。这种转换可能是会丢失精度的,例如从 CMYK 或 YCbCr 颜色空间进行转换。
type Color interface {
    // RGBA returns the alpha-premultiplied red, green, blue and alpha values
    // for the color. Each value ranges within [0, 0xFFFF], but is represented
    // by a uint32 so that multiplying by a blend factor up to 0xFFFF will not
    // overflow.
    RGBA() (r, g, b, a uint32)
}
返回值有三个重要的细微之处。第一,红、绿、蓝是经过 Alpha 预乘的:一个完全饱和但只有 25% 透明度的红色,通过 RGBA 返回的 r 值是 75%(而不是 100%)。第二,通道具有 16 位的有效范围:100% 的红色通过 RGBA 返回的 r 值是 65535,而不是 255,这样可以减少从 CMYK 或 YCbCr 转换时的精度损失。第三,返回的类型是 uint32,尽管最大值为 65535,这是为了保证两个值相乘不会溢出。这种乘法发生在根据第三种颜色的 Alpha 蒙版混合两种颜色时,遵循 Porter 和 Duff 的经典代数。
dstr, dstg, dstb, dsta := dst.RGBA()
srcr, srcg, srcb, srca := src.RGBA()
_, _, _, m := mask.RGBA()
const M = 1<<16 - 1
// The resultant red value is a blend of dstr and srcr, and ranges in [0, M].
// The calculation for green, blue and alpha is similar.
dstr = (dstr*(M-m) + srcr*m) / M
如果我们使用未经过 Alpha 预乘的颜色,上面代码片段的最后一行会更复杂,这就是为什么 Color 使用 Alpha 预乘值的原因。
image/color 包还定义了许多实现了 Color 接口的具体类型。例如,RGBA 是一个表示经典“每通道 8 位”颜色的结构体。
type RGBA struct {
    R, G, B, A uint8
}
请注意,RGBA 的 R 字段是 8 位 Alpha 预乘颜色,范围在 [0, 255] 之间。RGBA 通过将该值乘以 0x101 来生成 16 位 Alpha 预乘颜色(范围在 [0, 65535] 之间),从而满足 Color 接口。类似地,NRGBA 结构体类型表示 8 位非 Alpha 预乘颜色,这与 PNG 图像格式使用的颜色相同。直接操作 NRGBA 的字段时,值是非 Alpha 预乘的,但调用 RGBA 方法时,返回值是 Alpha 预乘的。
Model 仅仅是能够将 Colors 转换为其他 Colors 的东西,可能会丢失精度。例如,GrayModel 可以将任何 Color 转换为一个去饱和的Gray 颜色。Palette 可以将任何 Color 转换为一个有限调色板中的颜色。
type Model interface {
    Convert(c Color) Color
}

type Palette []Color
点和矩形
Point 是整数网格上的一个 (x, y) 坐标,轴向向右和向下递增。它既不是像素也不是网格单元。Point 没有固有的宽度、高度或颜色,但下面的可视化使用了小的彩色方块。
type Point struct {
    X, Y int
}
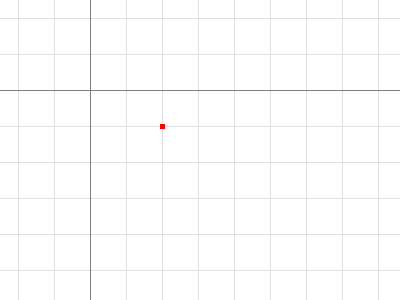
p := image.Point{2, 1}
Rectangle 是整数网格上一个轴对齐的矩形,由其左上角和右下角的 Point 定义。Rectangle 也没有固有的颜色,但下面的可视化用细彩色线勾勒出矩形,并标出其 Min 和 Max Point。
type Rectangle struct {
    Min, Max Point
}
为了方便起见,image.Rect(x0, y0, x1, y1) 等同于 image.Rectangle{image.Point{x0, y0}, image.Point{x1, y1}},但输入更方便。
Rectangle 在左上角是包含的,在右下角是不包含的。对于 Point p 和 Rectangle r,当且仅当 r.Min.X <= p.X && p.X < r.Max.X 且 Y 坐标类似时,p.In(r) 才为真。这类似于切片 s[i0:i1] 在低位包含,在高位不包含。(与数组和切片不同,Rectangle 通常具有非零的原点。)
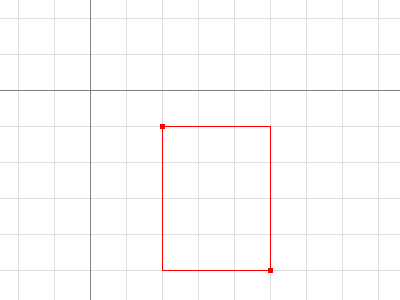
r := image.Rect(2, 1, 5, 5)
// Dx and Dy return a rectangle's width and height.
fmt.Println(r.Dx(), r.Dy(), image.Pt(0, 0).In(r)) // prints 3 4 false
将 Point 添加到 Rectangle 会平移该 Rectangle。点和矩形不限于被限制在第四象限。

r := image.Rect(2, 1, 5, 5).Add(image.Pt(-4, -2))
fmt.Println(r.Dx(), r.Dy(), image.Pt(0, 0).In(r)) // prints 3 4 true
两个矩形的交集会得到另一个矩形,该矩形可能是空的。
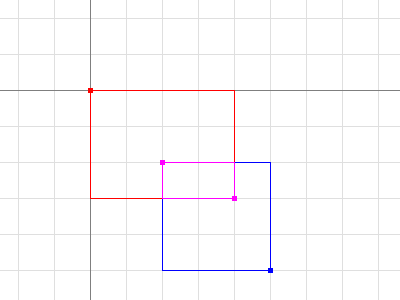
r := image.Rect(0, 0, 4, 3).Intersect(image.Rect(2, 2, 5, 5))
// Size returns a rectangle's width and height, as a Point.
fmt.Printf("%#v\n", r.Size()) // prints image.Point{X:2, Y:1}
点和矩形是按值传递和返回的。一个接受 Rectangle 参数的函数,其效率与接受两个 Point 参数或四个 int 参数的函数一样高。
图像
Image 将 Rectangle 中的每个网格单元映射到一个 Color,来自一个 Model。“(x, y) 处的像素”指的是由点 (x, y)、(x+1, y)、(x+1, y+1) 和 (x, y+1) 定义的网格单元的颜色。
type Image interface {
    // ColorModel returns the Image's color model.
    ColorModel() color.Model
    // Bounds returns the domain for which At can return non-zero color.
    // The bounds do not necessarily contain the point (0, 0).
    Bounds() Rectangle
    // At returns the color of the pixel at (x, y).
    // At(Bounds().Min.X, Bounds().Min.Y) returns the upper-left pixel of the grid.
    // At(Bounds().Max.X-1, Bounds().Max.Y-1) returns the lower-right one.
    At(x, y int) color.Color
}
一个常见的错误是假设 Image 的边界从 (0, 0) 开始。例如,一个动画 GIF 包含一系列图像,而第一个图像之后的每个 Image 通常只包含更改区域的像素数据,并且该区域不一定从 (0, 0) 开始。遍历 Image m 的像素的正确方法如下:
b := m.Bounds()
for y := b.Min.Y; y < b.Max.Y; y++ {
 for x := b.Min.X; x < b.Max.X; x++ {
  doStuffWith(m.At(x, y))
 }
}
Image 实现不必基于内存中的像素数据。例如,一个Uniform 是一个具有巨大边界和统一颜色的 Image,其内存表示仅仅是该颜色。
type Uniform struct {
    C color.Color
}
然而,通常情况下,程序会想要一个基于切片的图像。RGBA 和 Gray 等结构体类型(其他包称之为 image.RGBA 和 image.Gray)包含像素数据切片并实现 Image 接口。
type RGBA struct {
    // Pix holds the image's pixels, in R, G, B, A order. The pixel at
    // (x, y) starts at Pix[(y-Rect.Min.Y)*Stride + (x-Rect.Min.X)*4].
    Pix []uint8
    // Stride is the Pix stride (in bytes) between vertically adjacent pixels.
    Stride int
    // Rect is the image's bounds.
    Rect Rectangle
}
这些类型还提供一个 Set(x, y int, c color.Color) 方法,允许一次修改一个像素的图像。
m := image.NewRGBA(image.Rect(0, 0, 640, 480))
m.Set(5, 5, color.RGBA{255, 0, 0, 255})
如果您读取或写入大量像素数据,直接访问这些结构体类型的 Pix 字段可能效率更高,但也会更复杂。
基于切片的 Image 实现还提供一个 SubImage 方法,该方法返回一个由相同数组支持的 Image。修改子图像的像素会影响原始图像的像素,这类似于修改子切片 s[i0:i1] 的内容会影响原始切片 s 的内容。
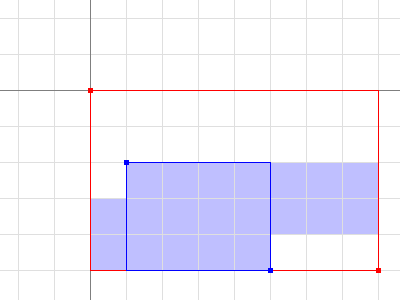
m0 := image.NewRGBA(image.Rect(0, 0, 8, 5))
m1 := m0.SubImage(image.Rect(1, 2, 5, 5)).(*image.RGBA)
fmt.Println(m0.Bounds().Dx(), m1.Bounds().Dx()) // prints 8, 4
fmt.Println(m0.Stride == m1.Stride)             // prints true
对于操作图像 Pix 字段的底层代码,请注意,遍历 Pix 可能会影响图像边界之外的像素。在上面的示例中,m1.Pix 覆盖的像素以蓝色着色。更高级别的代码,例如 At 和 Set 方法或image/draw 包,会将操作限制在图像的边界内。
图像格式
标准库支持多种常用图像格式,如 GIF、JPEG 和 PNG。如果您知道源图像文件的格式,可以直接从 io.Reader 解码。
import (
 "image/jpeg"
 "image/png"
 "io"
)

// convertJPEGToPNG converts from JPEG to PNG.
func convertJPEGToPNG(w io.Writer, r io.Reader) error {
 img, err := jpeg.Decode(r)
 if err != nil {
  return err
 }
 return png.Encode(w, img)
}
如果您有格式未知的图像数据,image.Decode 函数可以检测格式。识别的格式集在运行时构建,并且不限于标准库中的格式。图像格式包通常在其 init 函数中注册其格式,而主包将仅为了格式注册的副作用而“下划线导入”此类包。
import (
 "image"
 "image/png"
 "io"

 _ "code.google.com/p/vp8-go/webp"
 _ "image/jpeg"
)

// convertToPNG converts from any recognized format to PNG.
func convertToPNG(w io.Writer, r io.Reader) error {
 img, _, err := image.Decode(r)
 if err != nil {
  return err
 }
 return png.Encode(w, img)
}
下一篇文章:Go image/draw 包
上一篇文章:反射定律
博客索引